
Windows Requirements
Supported Windows Operating Systems
Windows 10 1903 (19H1) or their servers versions (fully updated 2019) and up
Software
Boost ≥ 1.80 (latest stable recommended) MySQL ≥ 8.0.34 OpenSSL ≥ 3.x CMake ≥ 3.24 (latest stable recommended) MS Visual Studio (Community) ≥ 17.4 (2022) (Desktop) (Not previews)
1. Git
View this thread for important details on how to install Git for best results.
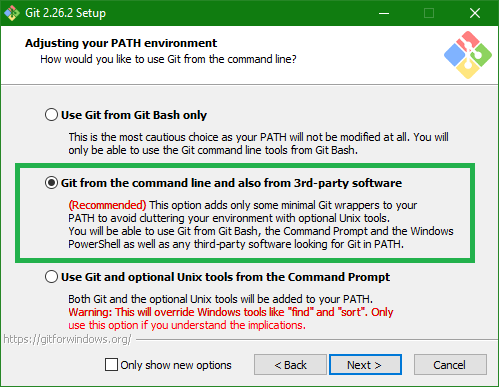
During Git installation - Adjusting your PATH environment. Pick "Run Git from the Windows Command Prompt"
1.1 Git Extensions
Git Extensions adds some visual extras and an improved UI for Git.
2. Visual Studio
The installer for VS no longer installs the C++ compiler by default.
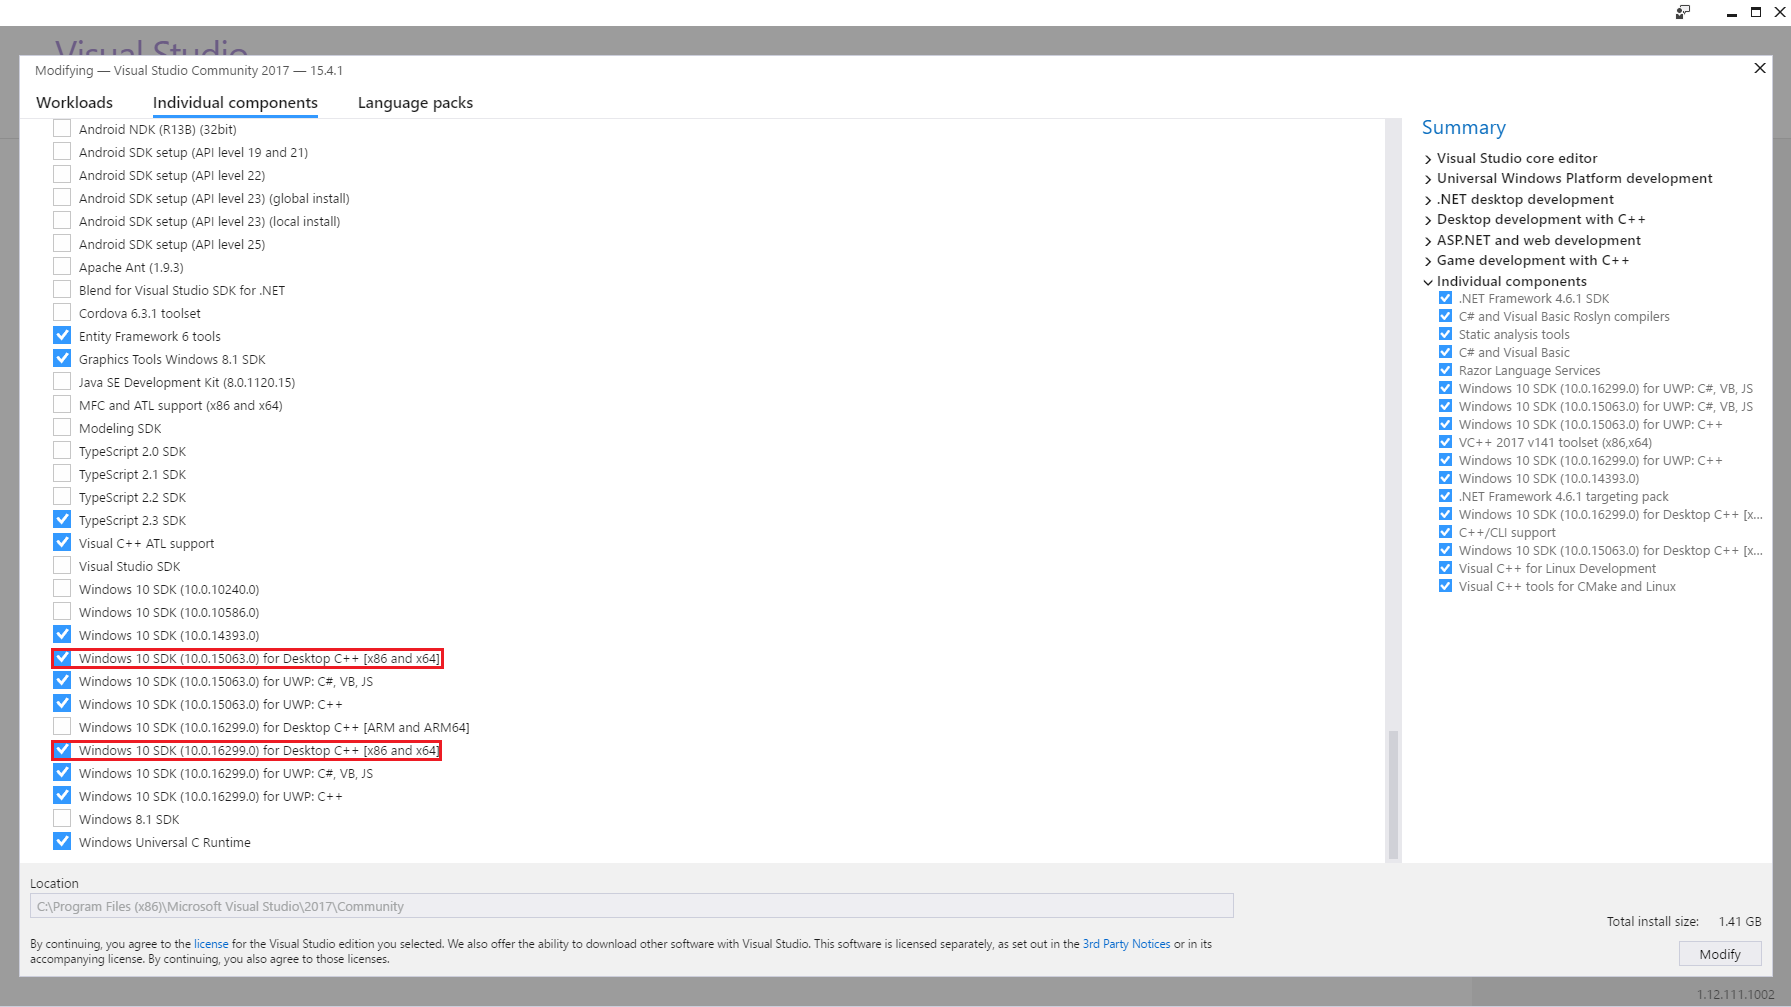
To enable it, select Custom in the type of installation and pick Desktop development with C++ as workload 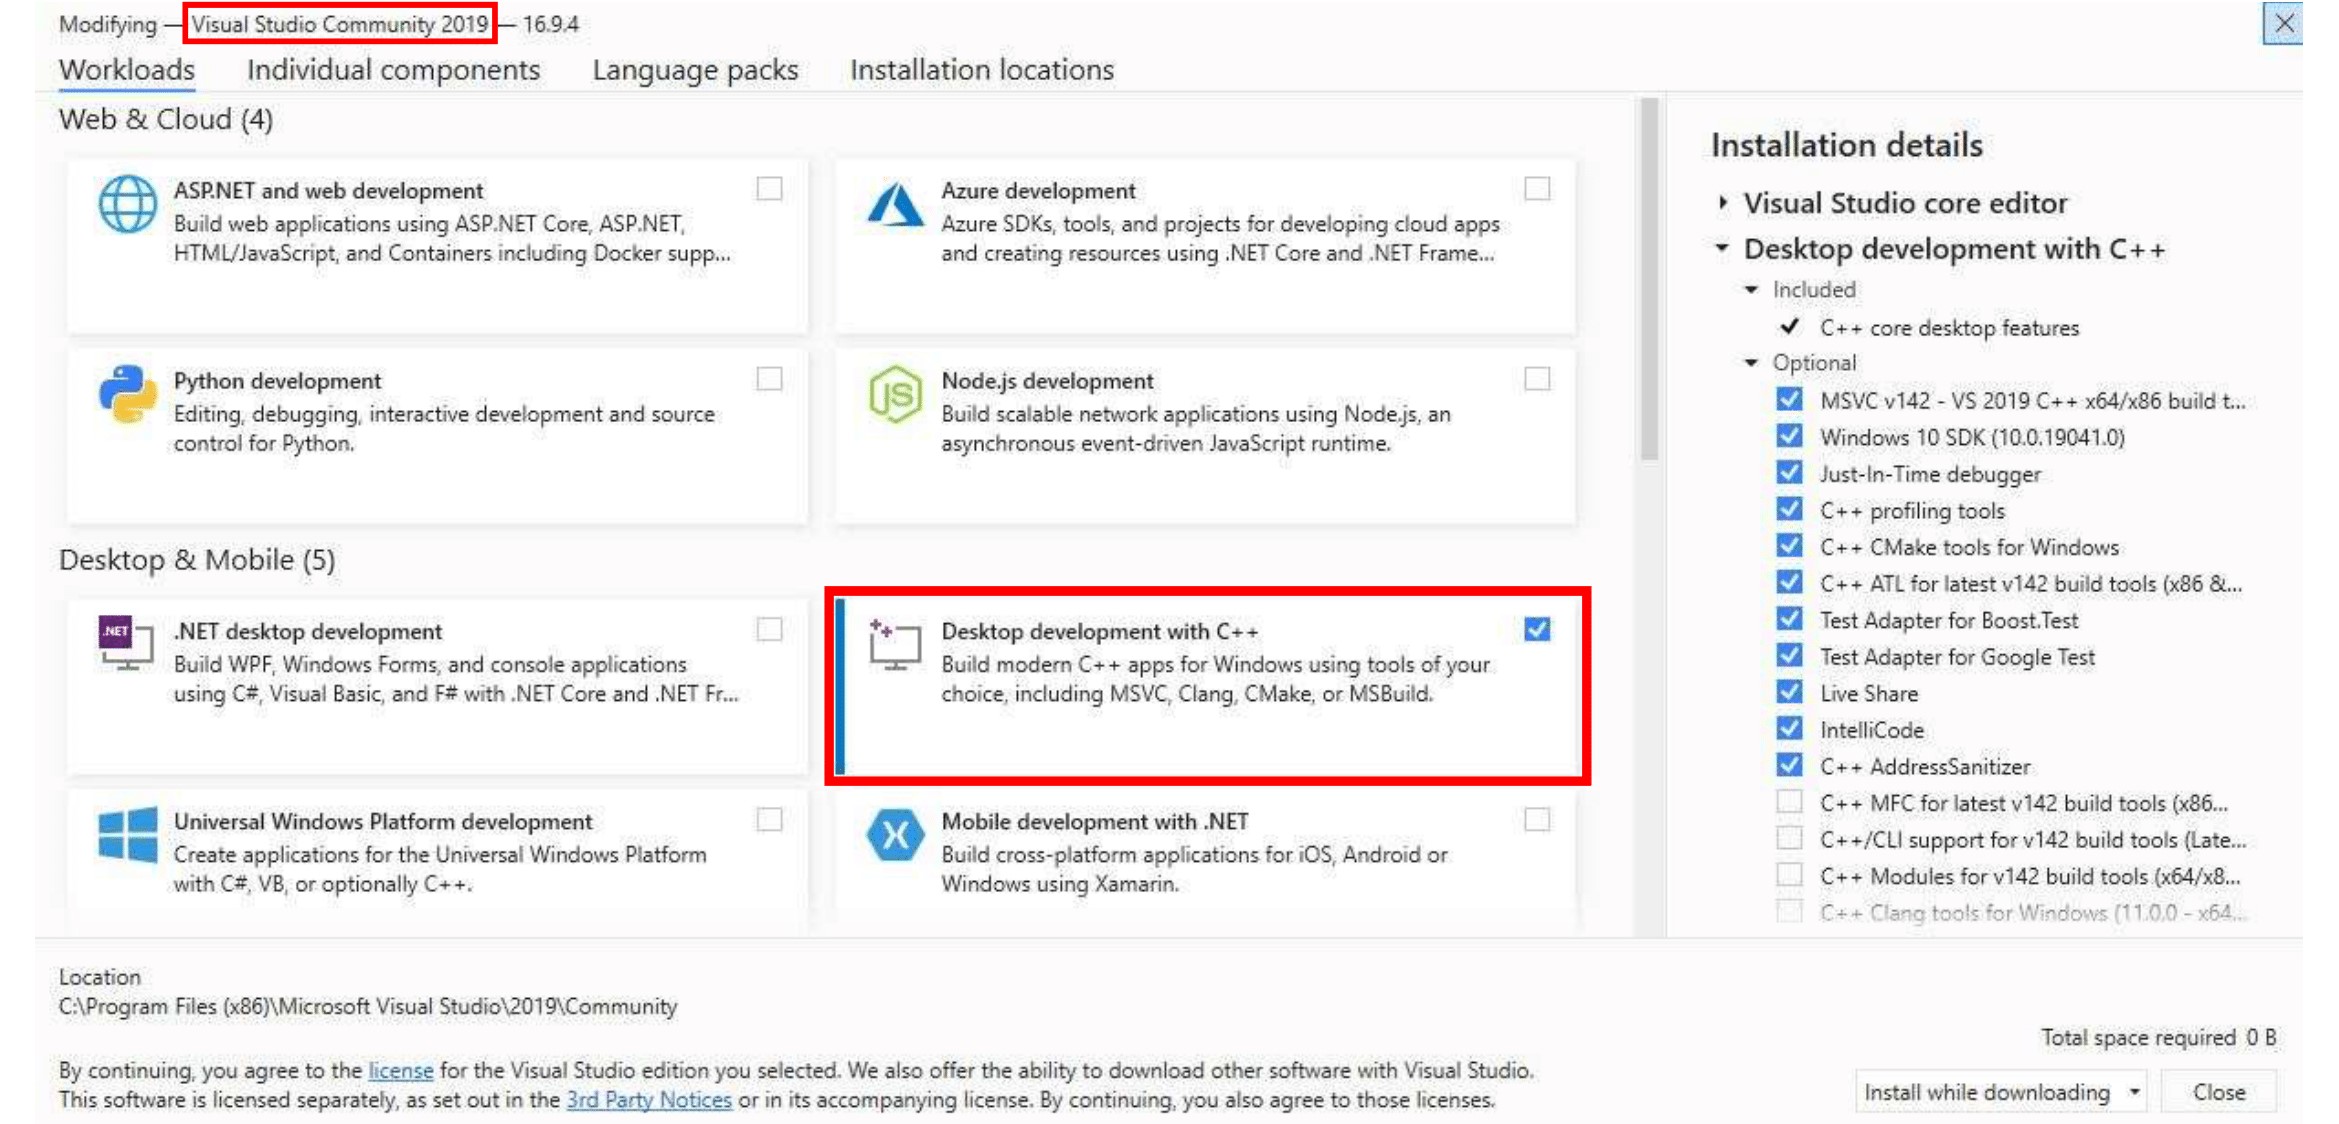 If you are running a Windows 10 Creator/Anniversary Edition, you additional have to install one Windows 10 SDK via Indiviual components out of the ones available
  You can also install it from command line with the command:
vs_community.exe /q /norestart /InstallSelectableItems NativeLanguageSupport_Groupor if you have enterprise version with:
vs_enterprise.exe /q /norestart /InstallSelectableItems NativeLanguageSupport_Group
3. MySQL Community Server Edition
- MySQL Community Server Edition Version 8.0 (highly recommended)
- Download the Windows MSI Installer.
- Scroll down to the bottom and click on "No thanks, just start my download."
- When the installation is almost done, make sure "Launch the MySQL Instance Configuration Wizard" is checked, then click "Finish".
- When the MySQL Instance Configuration Wizard launches, most default options are fine, but remember the username and password you use (root // whatever). You will need them to log into your chosen database management tool (below) in order to import SQL files later.
- To test if MySQL is set up correctly, hit CTRL+ALT+DEL on your keyboard, enter the Task Manager, and select the "Services" tab. In the list of services you should see "MySQL" with a status of "Running".
4. Database management tools
Choose one of these
- mysql cli (comes with MySQL installation)(fastest and recommended)
- SQLYog Community Edition
- MySQL Workbench (already installed if you chose to install full MySQL package)
- DBeaver (Multi-platform Database Management Tool)
5. Test your tool
Try connecting to your MySQL instance that you installed above. Depending on the program, you may be looking for "Connect to Host" or "New Connection" or "Session Manager". Create a new connection/session. The Hostname/IP address of "127.0.0.1" or "localhost" is fine if you installed MySQL on the same computer that you installed SQLYog. Simply fill in your root // whatever password and you should now be able to connect to your database
6. Boost
Depending on your boost version, you require newer CMake version. For example: boost 1.80 requires CMake 3.24.2 (with 3.24.1 it will display warnings).
- Download the prebuilt Windows Binary for Visual Studio 2022 (or higher) Here the links for minimum version:
If you prefer a higher Boost version check here: https://archives.boost.io/release/ Not all version are currently supported by TrinityCore (minimum is 1.78) To find the correct version we will explain on example: boost_1_80_0-msvc-14.3-64.exe: 1_83_0 = Version 1.83 -msvc-14.3 = Toolset v143 for Visual Studio 2022 (https://docs.microsoft.com/en-us/cpp/porting/binary-compat-2015-2017?view=msvc-170) -64 = 64bit
- Install the package to the default location (usually C:\local\boost_1_XX_0\ .)
- Add an environment variable to "System" variable named "BOOST_ROOT" and as value your Boost installation directory, e.g "C:/local/boost_1_83_0". Important is to use "/", not "\" when pointing to directory. (Make sure that it does not have a trailing slash (end of path). If you still get problems, add the same variable in the "USER" variables section too, like shown in the image below.)
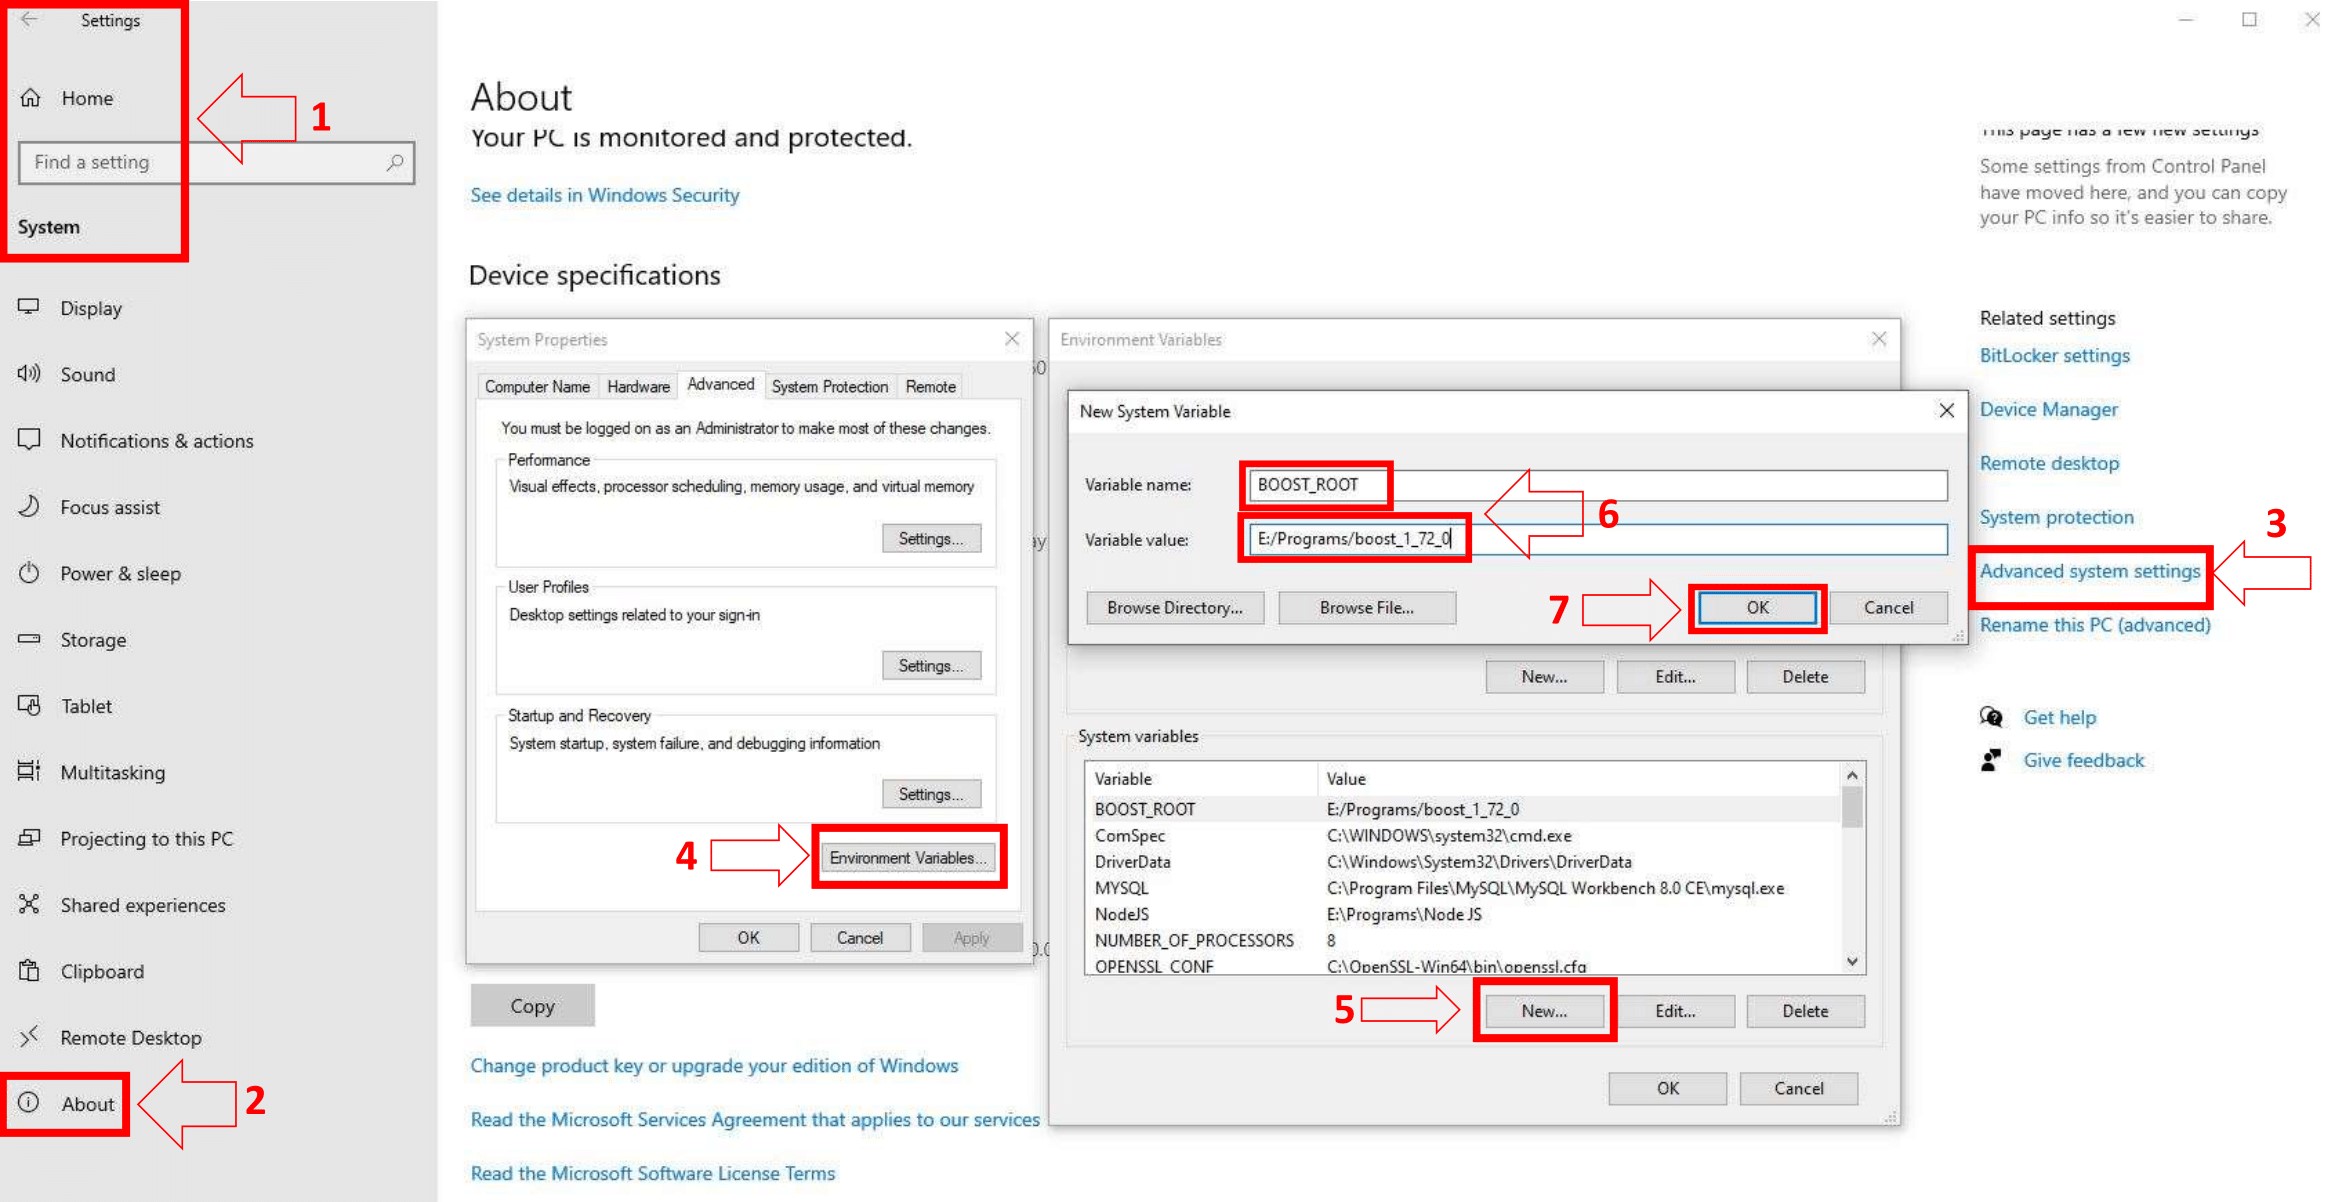 Notice that this image shows the version number 1.72.0 - use your actual version number in your settings.
7. CMake
- Download and install the Latest Release -windows-x86_64.msi file, NEVER the RC (Release Candidate) versions.
- Select "Microsoft Visual Studio 2022" do not select Win32 platform
- Note: If used different MySQL server e.g Wampserver with included MySQL or any other software, then is needed to point cmake to that directory (the same way how it was done for BOOST). Add an environment variable to "System" variable named "MYSQL_ROOT" and as value your MySQL installation directory, e.g "c:/wamp64/bin/mysql/mysql8.0.34". Important is to use "/", not "\" when pointing to directory. (use bundled mysql servers on your own risk, not supported)
8. MySQL development files
These files are shipped with MySQL Server, search for them at program files directory, MySQL\MySQL Server 8.X\lib and MySQL\MySQL Server 8.X\include.
9. OpenSSL
Download the 64bit version.
Use OpenSSL 3
Find the 64bit version by finding the latest Win64 OpenSSL that is NOT the "Light" version. - Example: Win64 OpenSSL v3.5.4 If you download the Light version, it will not work. If you download the Light version and report on Discord that you have an error, we will tell you to read this wiki.
While installing OpenSSL, choose The OpenSSL binaries (/bin) directory (NOT "The Windows system directory") when given the choice on where to copy the OpenSSL DLLs. These DLLs will need to be located easily for Core Installation.
(Optional)
- If you use different PCs to compile/run Trinity, install one of the following packages on your Server-PC to avoid missing dependencies (depending on your Visual Studio Version and your Server-PC Operating System)
- Microsoft Visual C++ v14 Redistributable Package (for Visual Studio 2017–2026)
- NOTE: Whatever you do you CAN'T run TrinityCore on Windows XP or Windows Server 2003 or Windows Vista or Windows 7.
- TortoiseGit
- This instruction supports Git Extensions only, but TortoiseGit is another viable option if you're comfortable with the process.